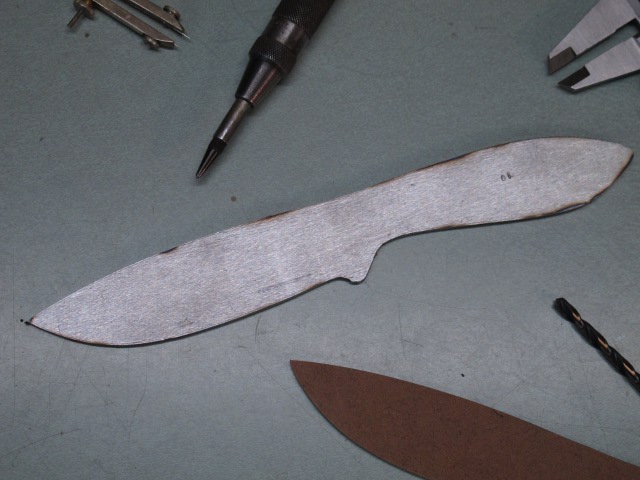
This is a description of the general steps I use when making a stock removal knife.
I plan to treat this as an active document; I may update and or/changed the content of these steps as I learn new techniques or change how I do things. Mostly this will describe techniques I use regularly, but I may also share other tricks, tips or suggestions on how to do something I have read or learned from others.
I plan to post parts of this as I write them so it may be a while before all steps are detailed. I also hope at some point to add photos to improve the explanation of some steps.
Designing a Knife
I start my knife designs in my head and then move to a sketch on paper. I draw inspiration from designs I see in magazines, books or at knife shows I attend. These days I also might get inspired by designs I see on the web. Sometimes if I see photo of a blade shape I like in a magazine I might go so far as to photocopy the photo, enlarge it until it is close to the size I like and then lay a clean piece of paper on the photocopy and transfer the general design to the paper.
I do a light tracing of the knife’s profile or silhouette, and then I start changing things by free hand, drawing and erasing; maybe add more curve here, add a different guard style or shape, change the handle or blade shape or curve, lengthen or widen the blade, etc. From freehand I move toward using French curves, a flexible curve, a compass and a ruler to further refine the shape.
I have never directly copied a pattern someone else made (made a knife shape exactly the same as someone else), but I have occasionally used another person’s design to give me a starting point to my own design. Sometimes I have used a knife I own or borrowed from a friend to trace the profile as a starting point as well.
It can be tricky when you are getting started in designing to get the proportions between the blade and handle balanced, and starting from a completed pattern design you like can help with that.
Some people prefer to use drawing software when designing knives and that is a viable approach, as long as you are comfortable with that environment. Others draw out a rough pattern on the actual steel bar stock (in the case of stock removal) and just start grinding and see what they come up with during the grinding process, doing much of their design as they grind. This is often the case with forging; much of the design work occurs as you work the steel, shaping the pattern of the knife as you go.
Whatever technique or approach you use, the most important thing, I think, is that you are comfortable with the approach, so that nothing inhibits your ability to create while you work.
For a knife where a longer ricasso is desired so one can choke up on the blade by wrapping an index finger around the ricasso just forward of the guard, I find leaving ~7/8” of steel between the “top” of the plunge cut and the front of the guard is about the right amount of space. You may feel the need to increase or decrease this space depending on how large the knife’s intended user’s index finger is or other factors.
A nice visual touch I sometimes like to add to my designs is to angle the top of the guard forward slightly by squaring it off of the bottom of the blade, especially if the blade as some belly to it. I tend to like to give most of my knives some belly so the edge ends up not being parallel to the spine.
Making a Knife Pattern
Once I have a drawing of a design I think works, I transfer the two dimensional drawing from the paper sketch to a pattern material. I like to use ~1/8” thick Masonite for my patterns. It is relatively inexpensive, easy to shape, and a nice thickness. Alternatives for pattern material include thin plywood, Plexiglas, aluminum or mild steel. Basically anything of the right thickness with some degree of rigidity and durability will work. Cardboard will work but tends to be flimsy and may not last very long.
To transfer the design from the paper drawing to the pattern material, I lay the drawing (taping it in place will help) on the Masonite, then using a needle (I mounted one in an old mechanical pencil) I punch holes through the paper into the Masonite every ¼ to ½ inch along the entire outline of the drawing. Then I just remove the paper and “connect the dots” on the Masonite with a pencil or pen. Now I have an image of the knife’s design on the pattern material that looks identical to the one drawn on the piece of paper.
Alternatively, you can photocopy the drawing, cut out the outline of the pattern and glue it to the pattern material. This is best if using mild steel or aluminum for your patterns.
I use a bandsaw, scroll saw, coping saw or the like to roughly cut out the Masonite pattern. A belt sander, files and sandpaper are used to fine tune the pattern down to the final shape. Now I have a three dimensional representation of the drawing I made on the paper. With this I can get a feel for what the knife will be like. I try the fit of the handle; I may pretend to cut with it and use it for the various tasks I expect the knife to be used for. This exercise helps somewhat inform me whether or not there are flaws in the basic design, prior to investing the time and energy in making the finished product. I probably will not catch all of the potential problems until I have the final product in hand and put it through its paces, but this simple step should help.
I can further adjust the design by sanding off some parts of the pattern, or tracing it and any changes onto a new piece of paper or Masonite and starting over.
Transferring the Knife Pattern to the Steel
Once I have a finished pattern, I select the thickness and alloy of steel I want to use. I lay the pattern on the steel, and while holding it firmly, trace the outline with a scribe. It may help to use a clamp of some sort to firmly hold the pattern against the steel; it is very important that the pattern does not shift while you trace the outline.
I cut the blade blank from the steel stock using a bandsaw, angle grinder or hacksaw. On my metal cutting bandsaw I use a bi-metal blade set at the slowest speed. I also regularly add cutting fluid (I like Cool Tool II) to the cut to lubricate the blade. Just go slow and steady.
Then I grind the blade blank to the scribe lines with a worn course belt (36 grit) on the grinder at full speed. I also use files to work the profile down.
Along the part the blade that will be the sharpened edge, I mark the steel with layout dye (Dykem type) or a black felt maker. Then I use a scribe or another appropriate device to mark two parallel lines along the dyed edge. It is very important that these lines are parallel to the edge of the steel blank. These lines will serve as a reference point and will help me keep the primary grind even when I grind it in later. If the knife is a full tang type and I plan to taper the tang, also dying and marking the handle portion of the blank will help with the taper grinding.
Plunge cuts
I use a straight edge to mark the location and angle of the plunge line with a fine-tipped felt marker. I mark both sides of the blade and make sure the lines are at the same angle by making index marks at the edge and spine of the blade.
I then prepare to file in the plunges:
1. First I clamp the mini vise into the main vise horizontally.
2. I clamp the blade blank into the mini vise with the edge toward me. I check that the blank is level with a torpedo level. Once level, I tighten the main vises jaws tightly around the mini vise.
3. Now loosening the mini-vise’s jaws around the blade blank slightly, I rotate the main vise until the 1/8” chainsaw file (clamped in the anti-rocking device) is parallel to and just to one side of the plunge line marked on the blade blank. I then tighten the rotation bolts on the main vise and firmly tighten the mini-vise’s jaws around the blade blank.
4. I mark the outline of the mini-vise’s jaws onto the blade blank with the fine-tipped felt marker to ease repositioning if the blank is bumped or moves later.
5. I set the vertical angle of the file by eye and begin filing the plunge. As I file the plunge, I adjust the angle of the file so the plunge reaches from the blade edge to as far up toward the blade’s spine as is desired.
6. During filing, I regularly clean the file with a file card and rub chalk into the file teeth to keep metal from building up in them.
6. I am also careful not to bend the file while filing, but make every file stroke smooth and even with just enough firm pressure to remove metal without creating a curve in the file. I check how evenly the file is cutting by occasionally marking the filed plunge groove with layout dye or a black felt marker. Then I make one or two light passes with the file. Wherever the file teeth contact the metal the dye is removed showing raw metal. I then adjust my angle or file pressure to focus on those areas that need filing.


I am interested in learning more about how a knife comes together I have a number of knife kits these are cut and the stock for the handle is included with the rivets what I would want to know I can follow you and if I need to ask a question I will.
Sounds good. Just jump in and send me any questions.