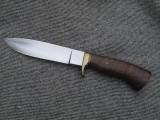
Here I describe the basic steps involved when I make the handle of a partial tang knife. Also called a stub tang, a partial tang knife is basically one in which the tang extends through a hole or slot in the handle from the guard to a point within the handle, but does not extend to and exit the end of the handle to be attached to a pommel.
The steps detailed here would be very similar to those used for a hidden tang knife (sometimes called a through tang, stick tang, rat-tail tang- one in which the tang extends through the handle to the end and exits the handle usually to be attached to a pommel or nut of some sort).
NOTE: Before adding the handle, finish the front of the guard, solder it on, polish the solder joint, etc., all the way up to the final polish which will be done after the handle has been sanded.
Select the preferred handle material and section (ie. block of wood). Cut or sand the block so the sides are reasonably parallel to one another.
If using a pattern for the handle, lay it on the block and trace the outline. Sometimes I use a tracing to give me a starting point for the shape of the handle, both from the side and above.
Lay the tang on the block and determine if the tang needs to be bent or otherwise altered to fit the block and the handle style desired. If bending is necessary, do not bend the tang along its length, or it will not be able to be slid into a straight hole drilled into the block. Try to do most of the bending right behind the guard so the tang itself stays mostly straight throughout its length.
Scribe/draw the centerline of the tang onto one side of the block and mark the center location at the butt of the block (where the pommel of the handle will be).
Scribe/draw the guard angle on the wood block.
Shape the block to match and fit the guard angle, all the while checking the block against the tang and the guard to insure the shaping is proceeding correctly.
When the guard angle on the block looks good, lay the tang on the block, snug it up to the guard so the bock and guard are good and tight, and trace the tang outline on the wood block.
Draw and mark the tang’s center point at the guard end of the block.
Set up drill-center tool in the drill press and drill the tang hole from the guard end. If drilling all the way through (for a hidden or through tang handle), drill from one end, then flip the block over and drill from the other end until the holes meet. If only drilling part way (for a partial tang handle) make sure to be very careful not to drill too far or make the hole too wide. Check the depth and width regularly against the blade’s tang.
Shape the hole with reamers, files, the tang-hole-saw tool, etc.
Cut spacer card and/or metal material into ~1 ¼” x ~1 3/8” pieces, rough up both sides with some 120 grt paper and file off any burs on both sides of all pieces, all the way around.
Clamp all of the spacer pieces together with a pair of vise grips.
Mark the tang shape/location onto the front piece of spacer then drill and file the spacer cards as a unit to fit the tang.
Disassemble the spacers and mark each one with an “F” for “toward the front or edge of the knife” and number them sequentially from the guard back.
Once the fit to the tang is good, file off any burrs around the holes in the spacers and clean everything with acetone and let dry.
Dry fit all the parts again and check that all the parts are tight with no gaps.
Re-trace as precisely as possible the location of the complete tang on the outside of the handle block. If there will be a pin through the handle and tang, make sure to note on the tracing where the junction of the tang and extension is.
Wrap the blade and guard in paper and tape it up to mask it from epoxy leakage. If using a stag taper for the handle, make sure to tape up the handle as well to keep epoxy out of the grooves.
Clamp the blade point down, spread epoxy on the guard and then add and epoxy each spacer piece. Don’t add too much epoxy, just enough to cover each surface.
Pour some epoxy into the tang hole in the handle block and spread some on the tang. Unclamp the blade and push the tang into the hole in the handle block.
Check to make sure the blade sides are a close as possible to parallel to the sides of the handle block.
Clamp the whole thing up in a pipe clamp, using a fitted block to hold the blade tip in the clamp.
When the epoxy has set, unclamp the knife.
Cut and sand the sides of the handle to remove lumps of epoxy and even them up.
Trace the handle pattern on the side of the handle if using a pattern.
Trace a centerline on top and bottom of the handle directly in-line with the blade.
Drill any holes for pins before shaping the handle.
Begin roughly profiling the handle down to the tracing by bandsawing off larger pieces.
Using the bandsaw, belt sander, rasps, drum sander, etc. to shape the handle and guard.
Make sure to grind the guard and any pins slowly and keep them cool enough so as not to melt the epoxy (or the guard’s solder, for that matter).
When the handle is close to finished shape, the pins can be inserted and epoxied in place. Putting the handle pins in at this later point decreases the chance of overheating them when shaping the handle.
Finish the handle with sandpaper of various grits form course to fine, and then seal it with some kind of oil or sealant.
A good paste wax and buff with a loose cotton wheel can help put a final shine on the handle.


Leave a Reply